
Guidelines for Posters & Presentations
Welcome presenters!
Please click the tab below 🡿 that matches your presentation type.
Where & How Do I
Upload
my Presentation Files?
Your presentations will be uploaded to either Mira, ETS or both, depending on the presentation type. Mira is the online streaming platform, while ETS is the A/V company handling slide presentations on-site in Hawaiʻi. See your presentation type below for further information.
Note: All videos should include audio for online viewers.
Detailed upload instructions will be emailed on or around 14 April 2025.
Please do not wait until the site opens to prepare your presentation!
Mira upload instructions will be in an email from mirasmart.com
ETS upload instructions will be in an email from preseria.com
Be sure to whitelist/allowlist the above domains so these emails make it to your inbox!
DO NOT EMAIL PRESENTATIONS!
Presentations that are e-mailed will be deleted.
Quick Summaries:
(click the tabs at left for full details)
Oral Presenters:
- Upload your PowerPoint/Keynote slide deck (ETS).
Educational Presenters:
- Upload your PowerPoint/Keynote slide deck (ETS).
Power Pitches:
- Upload your 2 minute pitch PowerPoint slide deck (ETS). Keynote files and videos will not be accepted.
- Upload your Digital Poster video (Mira), with audio for remote attendees, and add summary sections and timestamps (see the Uploading a Digital Poster tab for details).
Digital Posters:
- Upload an 8-minute Digital Poster video (Mira), with audio for remote attendees, and add summary sections and timestamps (see the Uploading a Digital Poster tab for details).
Traditional Posters:
- Bring your pre-printed poster (up to 92x92cm or 36”x36”) to the meeting and mount it in your assigned space on Sunday, 11 May, between 07:00 and 14:00. Posters must remain up until Thursday, 15 May, at 12:00.
- Prepare a PDF version of your poster to upload to the meeting portal.
DO NOT EMAIL presentations! Presentations that are e-mailed will be deleted.
Downloadable
Declaration Slides
for Oral & Educational Presentations
Accreditation Council rules require that every oral presentation begin with the speaker making a disclosure of relevant financial interests or relationships. This disclosure must be done both via a slide and orally during the presentation, and will be in addition to the published disclosures in the Syllabus and Proceedings.
Declaration slides are MANDATORY for oral and educational presentations, even if you have nothing relevant to declare. You will NOT be permitted to continue to present if this disclosure is not made.
Declaration slides are RECOMMENDED for Digital Posters, but not required.
Choose the appropriate slide from the list below and click the link to download the PowerPoint template file to your computer.
.PPTX
For PowerPoint (2007-20XX) and Keynote users
.POTX
Template file for PowerPoint (2007-20XX) users (PC)
.PPT
For older versions of PowerPoint (97-2003)
Guidelines for
Scientific Oral/Educational Sessions
in Hawaiʻi
Note: No video uploads are required this year.
Please upload your PowerPoint/Keynote file only.
Nine (9) minutes are allotted for your oral presentation followed by 3 minutes for discussions.
- Upload your PowerPoint/Keynote slides via the ETS portal for use presenting in the meeting room.
File Name Formatting
Help us keep track of your file!
Please name it like this:
[4-digit program #].pptx
Please do not use any other numbers or words in your filename! Program number ONLY.
To present your research effectively in this limited time, do not attempt to cover too much material. Discuss only the major points of your work, especially the conclusions drawn from your data. Do not include commonly known background information.
The declaration of financial interests or relationships should be your first or second slide, and it should show the same “declaration” information you provided when you submitted the abstract. Please see the declaration slide tab to download the template slides.
This is MANDATORY even if you have nothing relevant to declare. Your slides will NOT be presented if this disclosure is not made.
The next slide should give the presentation title and authors. Briefly cover the background and motivation, but focus your time on methods, results, discussion, and conclusions. If there is to be an acknowledgement, it should be on one slide at the end and not a part of the formal oral presentation. (Do not spend excessive time on title, co-authors, historical work, motivation, and too little on methods, results, and discussion.)
Practice your presentation until you can present it clearly in nine minutes. If you use more than your allotted time, the moderator of the session will terminate the presentation.
A useful rule for slides is to use no more than one (1) slide for each minute of your presentation. For suggestions on preparing slide presentations and technical requirements, please view the SLIDE DESIGN and VIDEO PRODUCTION tabs.
In order to make all slides legible from any seat in the room, we strongly advise using large, readable fonts and uncrowded slides, for example readable on a laptop from as far as 2-3 meters away.
Finally – try to make your presentation understandable to a broad audience:
- Give a brief background that provides context
- Use simple slides, and avoid needless details.
- Label your diagrams and images with arrows and words (avoid a,b,c when you can label images directly!)
- Discuss reasonable applications, next steps, and limitations of your work.
- Summarize the impact of your work.
Before the Session
All speakers are required to check in at the Speaker Ready Room no later than the day before their presentation. No exceptions. The location and operating hours of the Speaker Ready Room are noted in the Vital Details column to the right.
IMPORTANT:
Online submission does not excuse a speaker from checking into the Speaker Ready Room.
Check Your Work!
Double- and triple-check your presentation before submitting. We suggest having a friend or colleague review the presentation as well, if possible, to look for problems you may have missed.
Presentation Guidelines
Speaker Ready Room
Don’t forget: All speakers are required to check into the Speaker Ready Room to test their PowerPoint/Keynote presentation prior to their session! Speakers will have a quicker check-in process by uploading their presentation via the meeting website, but same-day uploads MUST be done at the Speaker Ready Room.
Presentations submitted online will be available on a Speaker Ready workstation for review.
- Please make sure all fonts display as expected (use the EMBED FONTS feature in PowerPoint) and all audio/video clips play properly.
- All hyperlinks (usually blue and underlined with a link to a website, e-mail address or document) should be removed.
All editing must be completed 2 hours prior to the start of your session. Only one PowerPoint/Keynote file may be submitted for each assigned speaking time.
Session room computers are all configured the same and have some important limitations:
- There is no Internet access available on the session room computers.
- There will be NO keyboards at the session room computers. A presentation must function only with a mouse.
- Software cannot be installed on session room computers.
- There are no video ports or other connections at the podium for a speaker’s laptop or other device. Do not plan to use your own device for your presentation.
- The image on the preview monitor will be the same image that is projected to the audience. Displaying notes (i.e. Presenter View) is not an option for this reason.
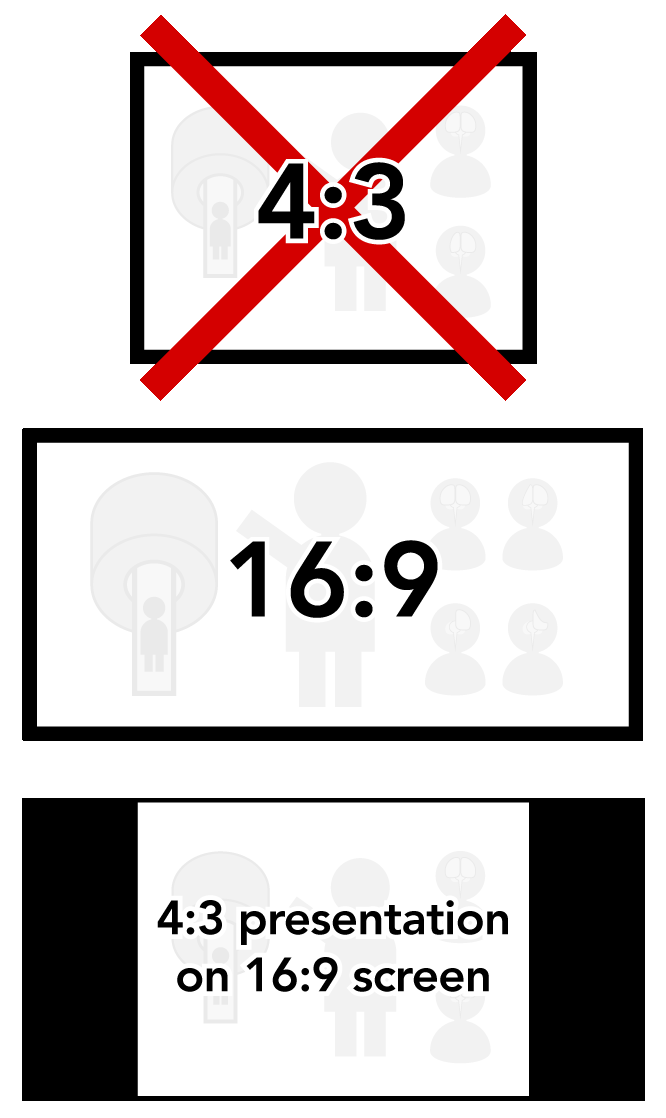 All screens in the meeting rooms will be 16:9 widescreen format. To take advantage of this, speakers must set the PAGE FORMAT or SLIDE SIZE to 16:9 widescreen prior to creating their presentation. While square presentations (4:3) will work, there will be black bars on both left and right sides of the video (see illustration).
On-site computer & software details are in the Vital Details column to the right.
IMPORTANT NOTE: If your PowerPoint presentation contains video files, it is very important that they are tested in the Speaker Ready Room as early as possible. If your video file fails to display properly, it may take hours to fix in some cases. Windows users with Office 365 or PowerPoint 2016 and newer can avoid this by using the Optimize Compatibility function (File -> Info) before saving your presentation. If the video cannot be optimized, there is a good chance it will not play when presented at the meeting.
A Note to Apple Mac users:
The PowerPoint file must have the .PPT or .PPTX suffix to be accepted.
Guidelines for
Educational Session Presentations
in Hawaiʻi
Note: No video uploads are required this year.
Please upload your PowerPoint/Keynote file only.
The length of educational presentations varies by session, so please check your invitation to find out the duration of your talk and/or contact the session organizers if you are unsure.
Educational File Name Formatting
Help us keep track of your file!
Please name it like this:
[submission ID# (starts with E)].pptx
Please do not use any other numbers or words in your filename! Submission ID ONLY.
- Upload your PowerPoint/Keynote slides to ETS
- Consider making full use of current features available in PowerPoint or related programs.
- Provide an introduction that enables a broad audience to understand your presentation, such as a disease overview for medically oriented presentations, or a careful list of advantages/disadvantages of techniques to those who may not follow the technical details
- Try to make at least 25% of your presentation understandable to 75% of the membership!
- Check the Slide Design tab for suggestions.
Guidelines for
Power Pitches
in Hawaiʻi
IMPORTANT!
- Virtual presentation is not possible during the meeting.
- Your 2-minute pitch slide deck will be shown during your pitch presentation. Your pitch will be included in the session recording, which will be posted online after the meeting.
- You will present your digital poster at your assigned station during the second hour of your session. The poster will also be available online for attendees, but your presentation of it will not.
A two-hour Power Pitch session comes in two parts. The first hour is a rapid-fire series of two-minute pitches by all presenters in that session. Afterwards, the presenters go to their digital poster stations (in the same room) for the second hour, where they can discuss their work with any interested attendees at a Digital Poster.
Power Pitch presenters will need to upload two files:
- 2-minute PowerPoint slide deck for your pitch. Upload your PowerPoint file to the ETS portal. You will present this slide show live in the Power Pitch Theater.
- Important note: Only PowerPoint files can be submitted. Keynote and video files will NOT be accepted.
- Digital Poster. Follow the guidelines for submitting a Digital Poster (see tab at left). You will upload an 8-minute video to Mira (with audio for people viewing your poster online) together with summary sections that link to points in the video.
File Name Formatting
Help us keep track of your file!
Please name it like this:
[4-digit program #].pptx
Please do not use any other numbers or words in your filename! Program number ONLY.
Check Your Work!
Double- and triple-check your presentation before submitting. We suggest having a friend or colleague review the presentation as well, if possible, to look for problems you may have missed.
The Pitch
Test your 2-minute pitch presentation prior to your session by visiting the Speaker Ready Room. You can make this process faster by uploading your pitch as early as possible.
- Please make sure all fonts display as expected (use the EMBED FONTS feature in PowerPoint) and all audio/video clips play properly.
- All hyperlinks (usually blue and underlined with a link to a website, e-mail address or document) should be removed.
All editing should be completed 2 hours prior to the start of your session. Only one PowerPoint file may be submitted for each assigned speaking time.
All screens in the exhibition hall will be 16:9 format. To take advantage of this, speakers must change the PAGE FORMAT or SLIDE SIZE to 16:9 widescreen prior to creating their presentation. While square presentations (4:3) will work, there will be black bars on both left and right sides of the video (see illustration).
Computer & software details are in the Vital Details column to the right.
IMPORTANT NOTE: If your 2-minute PowerPoint presentation contains video files, it is very important that they are tested in the Speaker Ready Room as early as possible. If your video file fails to display properly, it may take hours to fix in some cases. Windows users with Office 365 or PowerPoint 2016 and newer can avoid this by using the Optimize Compatibility function (File -> Info) before saving your presentation. If the video cannot be optimized, there is a good chance it will not play when presented at the meeting.
A Note to Apple Mac users:
Keynote files will NOT work for Power Pitches. The PowerPoint file must have the .PPT or .PPTX suffix to be accepted.
The Digital Poster
The Digital Poster portion of your power pitch presentation will be presented in the Power Pitch Theatre following the 2-minute pitches. It will follow the format of other Digital Posters – see the Digital Posters tab at left for all details.
Guidelines for
Digital Posters
in Hawaiʻi
IMPORTANT!
- Virtual presentation is not possible during the meeting.
- If you are unable to attend, please have a co-author present in your place. Email info@ismrm.org with their name, e-mail address, and digital poster number with the subject line Poster Presenter Change.
- If you have registered for virtual attendance, you will be able to access the online platform and view and respond to any questions regarding your abstract.
- Your Digital Poster will be available for viewing by both in-person and virtual meeting attendees and will be used by you for presentation at the meeting.
- ISMRM is not enforcing a deadline to upload MP4 videos for digital posters. We highly recommend uploading as soon as possible. Processing time for video conformation can increase from 15 minutes to over 2 hours as the meeting approaches. All uploaded videos must be reviewed to verify no glitches occurred during the upload process. You may replace your video as often as needed up until 24 hours before your presentation. Digital posters uploaded by April 25th will be available for viewing by registrants when our proceedings are published. Reminder: e-mail support ends on May 4th.
Digital Posters are presented using the new format, which includes summary text that links to an eight (8) minute video.
Please see the Digital Poster preview or longer Digital Poster Introduction videos, and try the clickable online demo to understand the new format. Online or in-person attendees can access the full digital poster in the program, including audio within the video. You will use the same format to present your poster in the exhibition hall. Audio from your video will NOT be available on the exhibition floor. You will be able to advance the video using sliders, forward/back controls, and links from the title and summary sessions.
A digital poster video presentation can be created in PowerPoint or Keynote and should include audio for online viewers. See the Video Production tab for info on making a video from PowerPoint or Keynote. Your video must be in .mp4 format and should be 16:9 aspect ratio, as with other presentations, and include subsections that match the summary section titles. The digital poster will be uploaded using Mirasmart’s digital poster submission site.
File Name Formatting
Help us keep track of your file!
Please name it like this:
[4-digit program #].mp4
Please do not use any other numbers or words in your filename! Program number ONLY.
Maximum video file size: 500 MB
Guidelines for Digital Poster Videos:
- A sample PowerPoint template is available for download here.
- The aspect ratio should be 16:9 as with oral presentations, and many hints for oral presentations apply equally.
- The first slide should be an uncluttered “cover slide.” We recommend a simple summary figure.
- The second slide can be a detailed title slide, although this information is in the poster so can be omitted here.
- The next slide can be an optional disclosure slide. It is not required for digital posters.
- Avoid using small images and text.
- The slides should be self-explanatory. Text and audio should be brief and well-organized.
- The presentation should include (as separate elements) major sections, for which you will submit summary text for the left side of your poster.
- Patient confidentiality must be protected. No names or fully exposed faces should appear in illustrations or images.
- Clicking the “View My Poster Video & Summary” button will show you how your poster will be viewed by attendees.
- See the Video Production tab for more information on making videos and recording audio.
Consider making full use of current features available in PowerPoint or other software. Is a PowerPoint recording (alone) the best way to convey your message? In some cases, a video demonstration at the scanner or workbench or a recording of your screen while you show code or software may be more effective.
Presentation Upload Instructions
All presenters must upload their presentation via Mira. See the Vital Details column for more info.
How to Upload & Timestamp a
Video for your Digital Poster
in Hawaiʻi
Watch the Digital Poster preview or longer Digital Poster Introduction videos, and try the clickable online demo to understand how the new digital poster format works.
You will receive an email from mirasmart.com with a link that will allow you to upload your Digital Poster (or Power Pitch Poster) video.
Each accepted Digital Poster and Power Pitch that you have will receive a SEPARATE email and link.
ISMRM is not enforcing a deadline to upload MP4 videos for digital posters. We highly recommend uploading as soon as possible. Processing time for video conformation can increase from 15 minutes to over 2 hours as the meeting approaches. All uploaded videos must be reviewed to verify no glitches occurred during the upload process. You may replace your video as often as needed up until 24 hours before your presentation. Digital posters uploaded by April 19th will be available for viewing by registrants when our proceedings are published. Reminder: e-mail support ends on April 27th.
After clicking the link you will see the following screen.
Step 1.
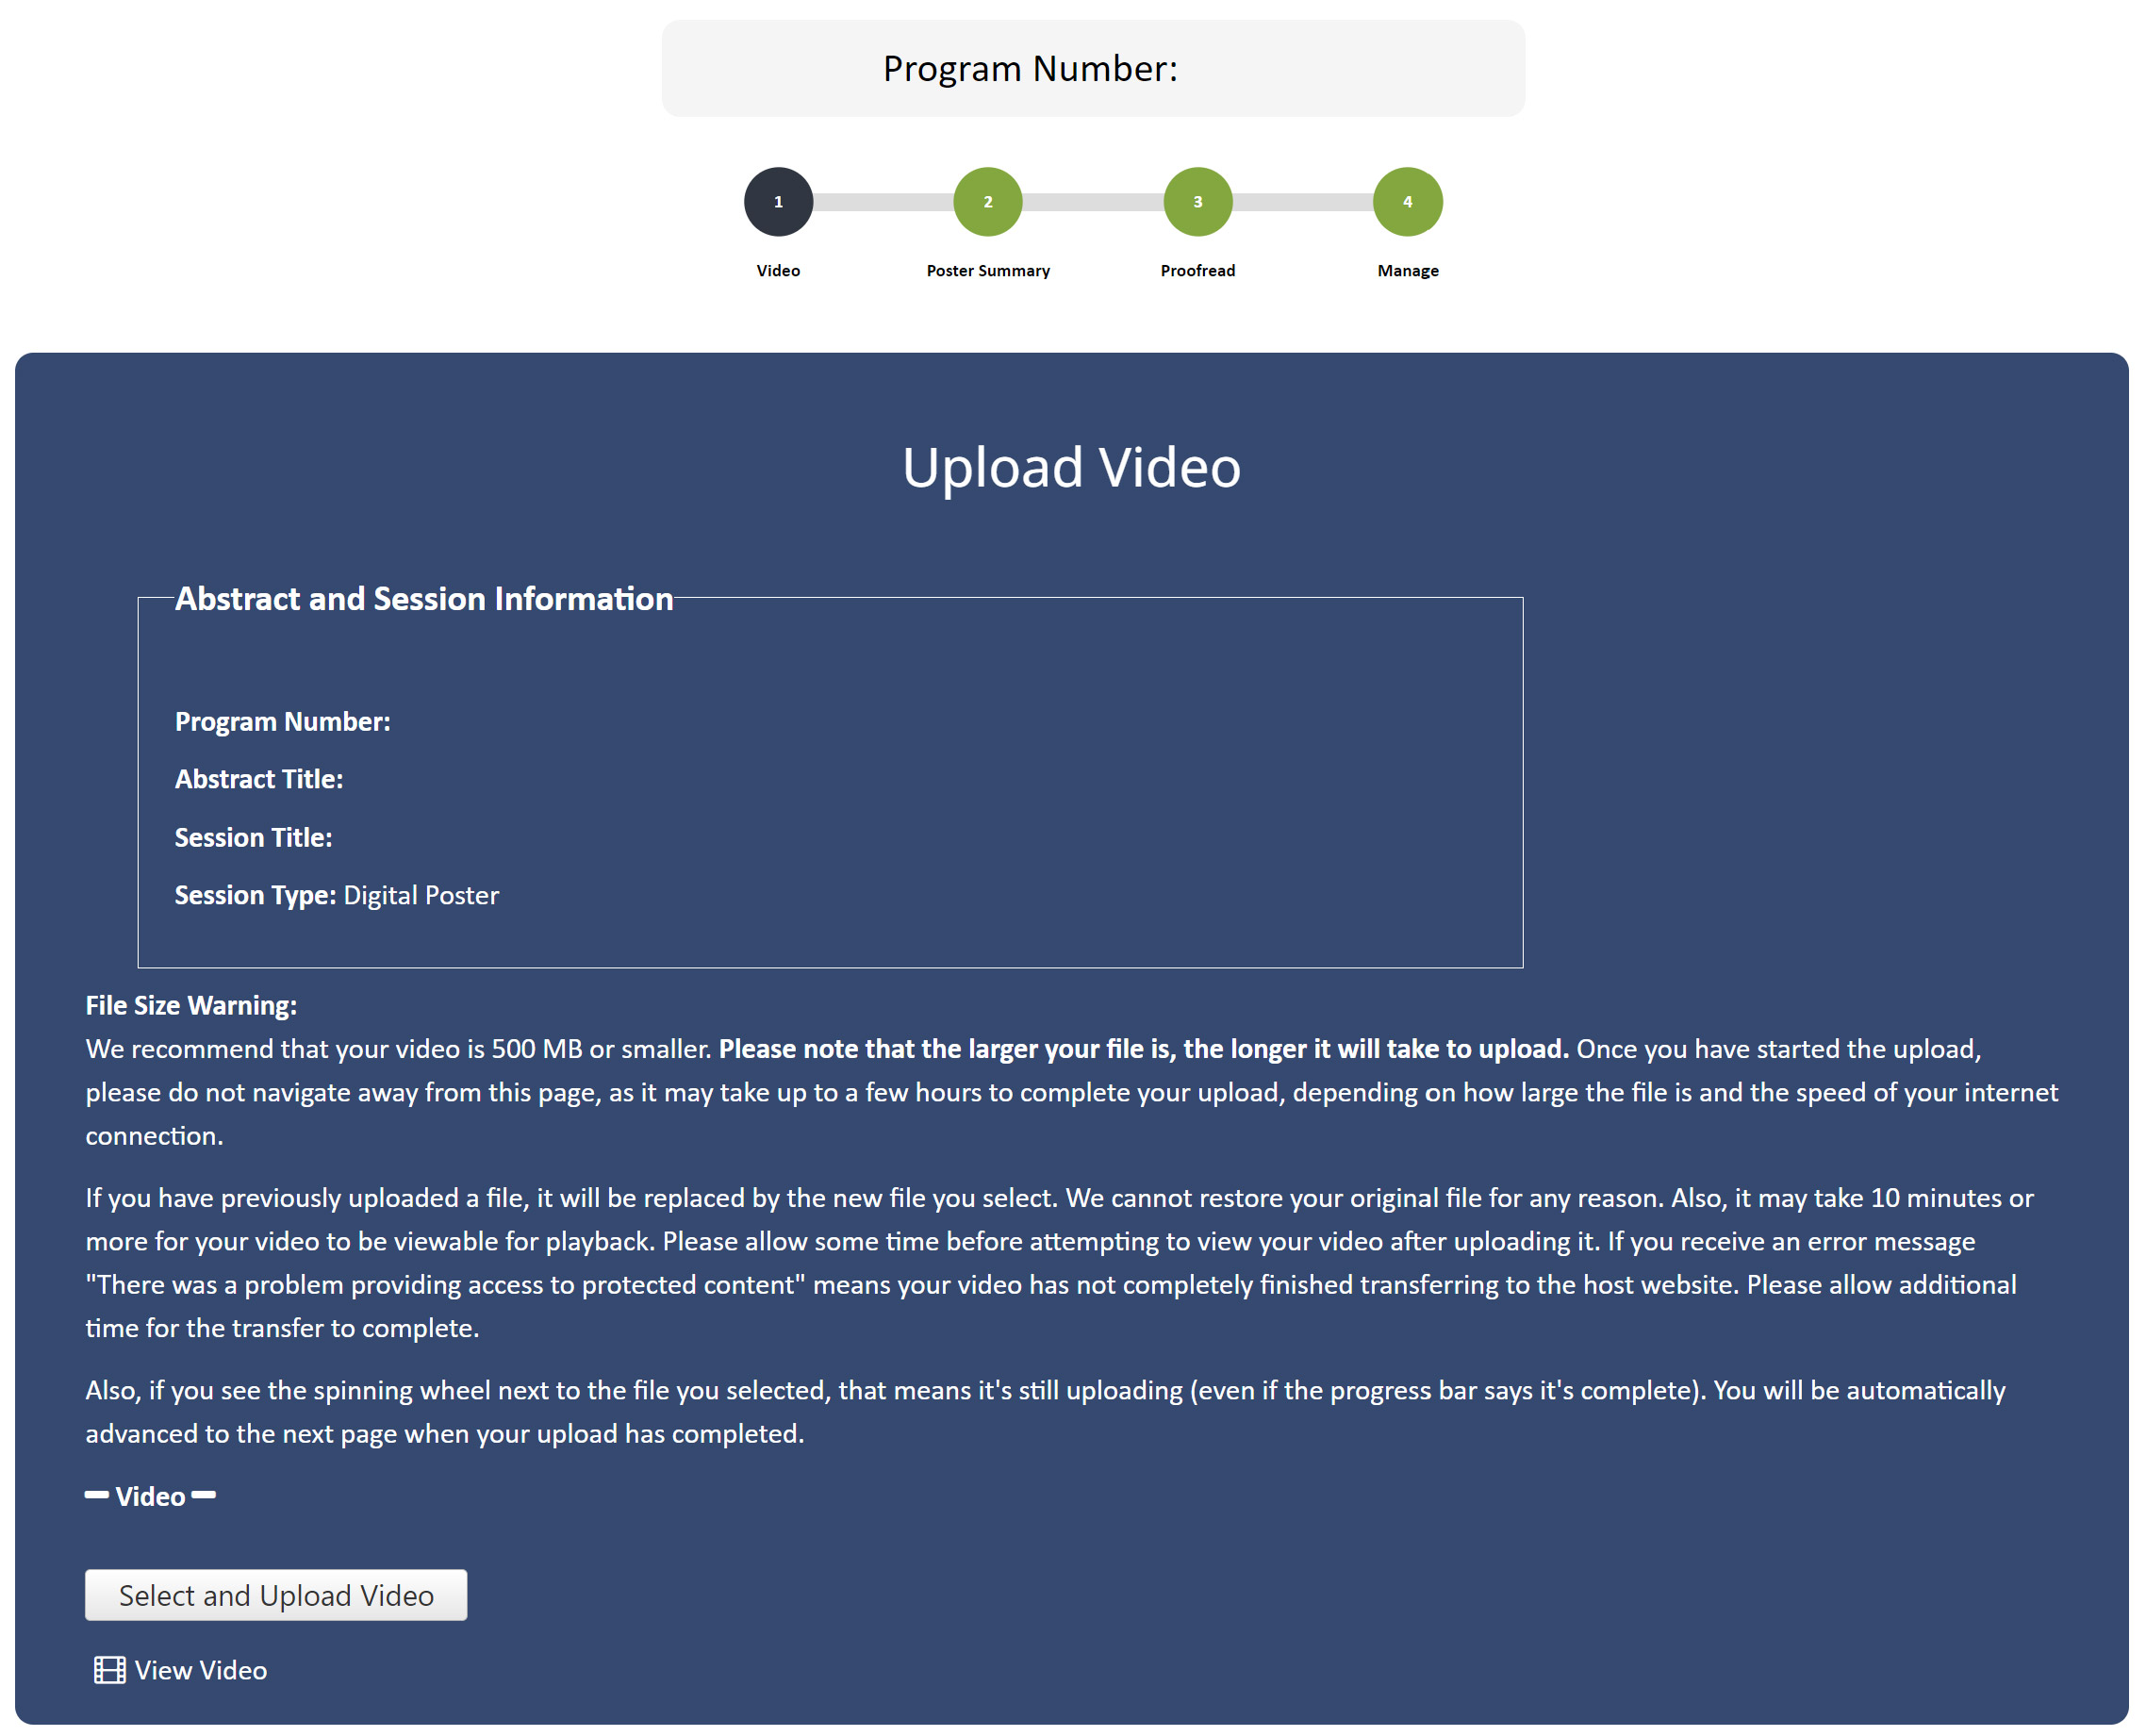
This screen will display your abstract details. Be sure you are uploading the video associated with the abstract shown.
Click the “Select and Upload Video” button.
Select your video and click Ok. A progress bar will appear at the bottom of the screen.
When the upload is complete, the progress bar will show a green check mark and automatically advance to step 2.
File Name Formatting
Help us keep track of your file!
Please name it like this:
[4-digit program #].pptx
Please do not use any other numbers or words in your filename! Program number ONLY.
Step 2.
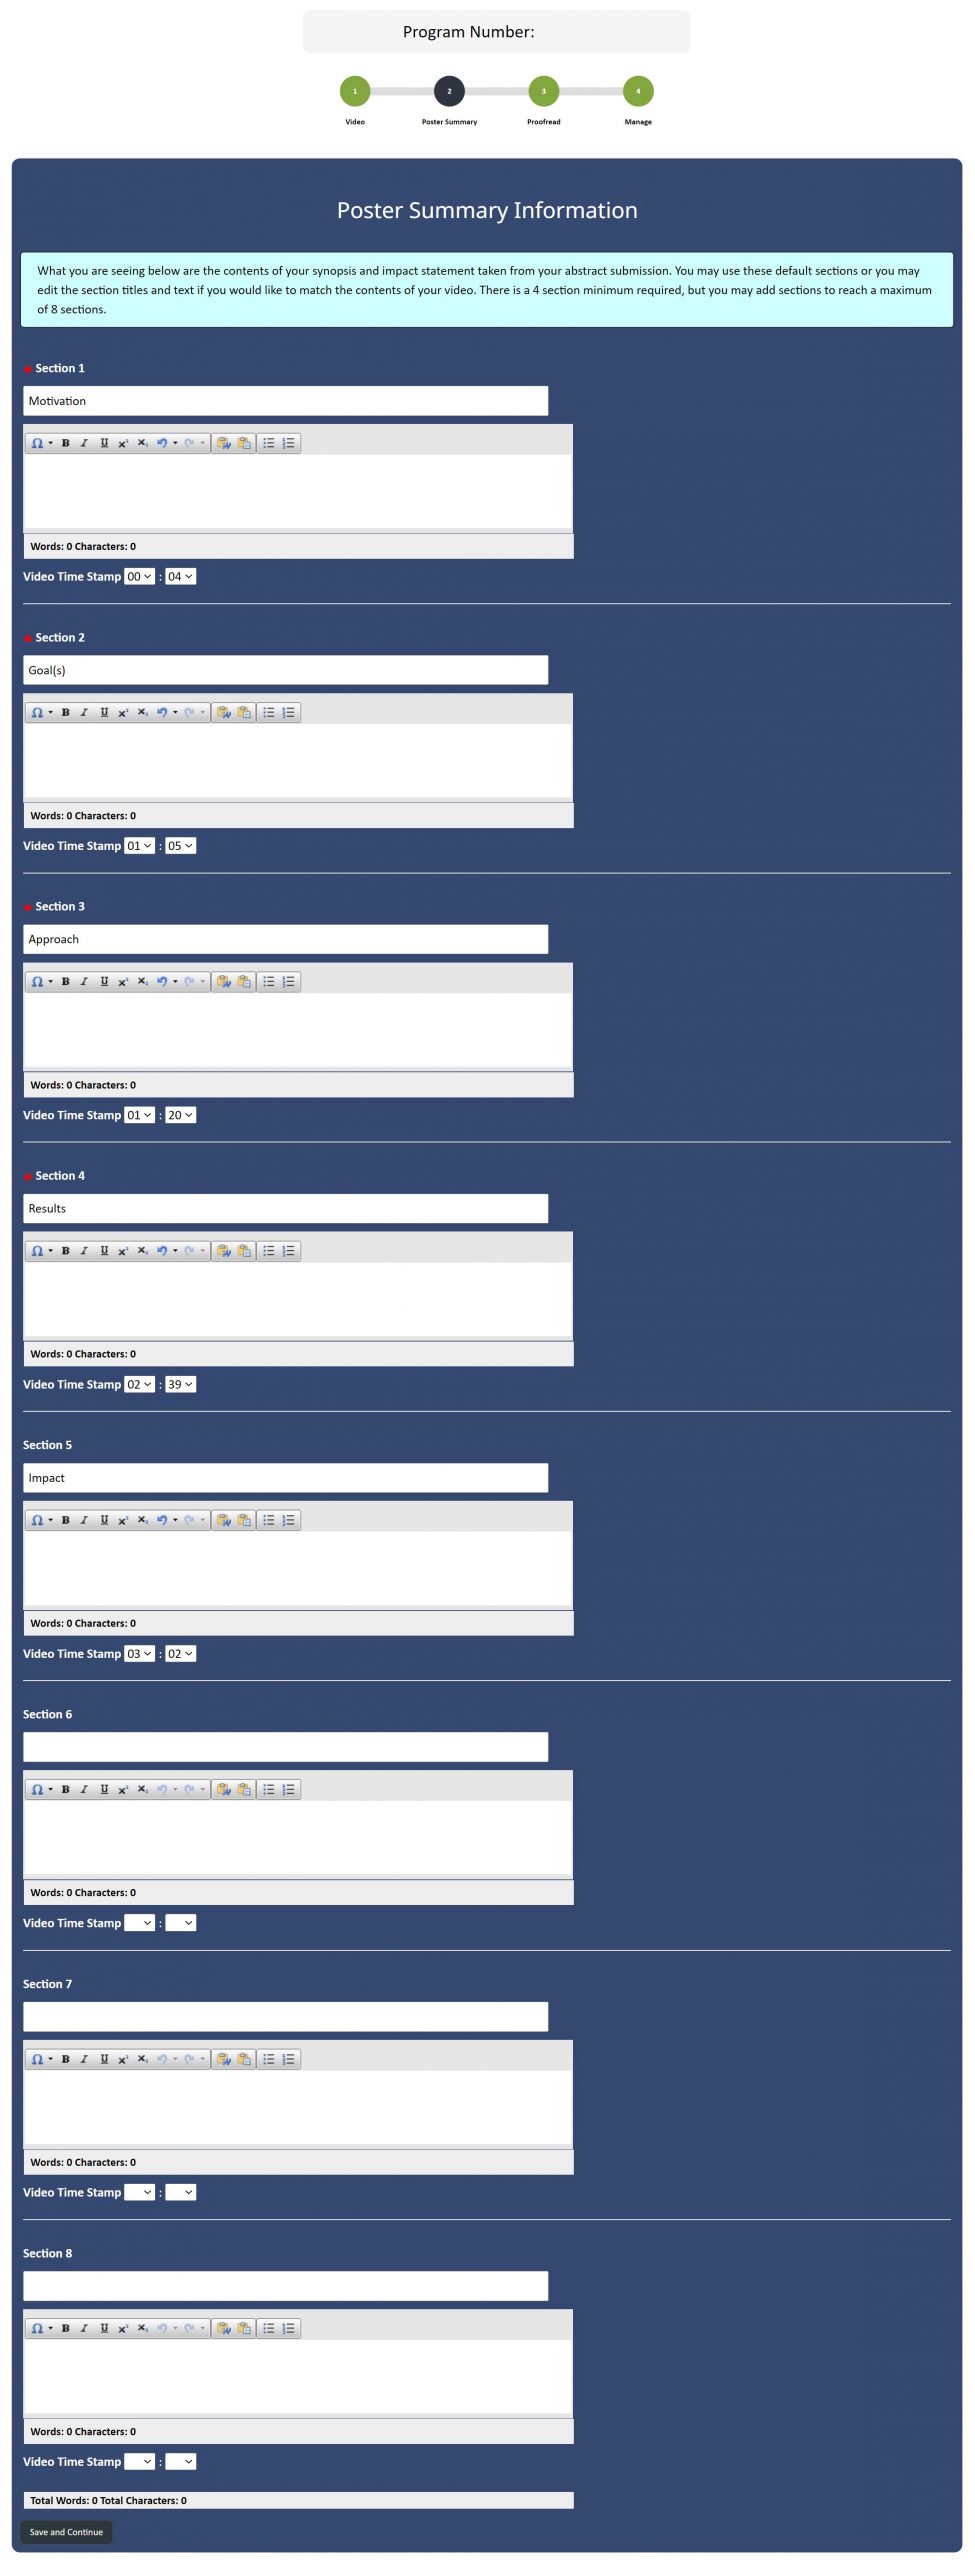
Initially, your abstract’s synopsis and impact statement are automatically populated in each summary section (you can change this – see below). Below each section, you must enter the timestamp from your video that corresponds to that summary section.
For example, if you discuss your goal(s) for your work at about 1 minute and 14 seconds into your video, select 01 for the first drop-down in that section and 14 for the second drop-down.
Note that you can completely change the titles and text for these sections. The synopsis/impact is the default option, but you can make them how you see fit.
Enter and/or check the title, text and timestamp for each section. A minimum of 4 sections is required, with a maximum of 8.
The text limit for all sections combined is 150 words, so be concise!
When you have completed this, click the “Save and Continue” button at the bottom of the page.
Step 3.
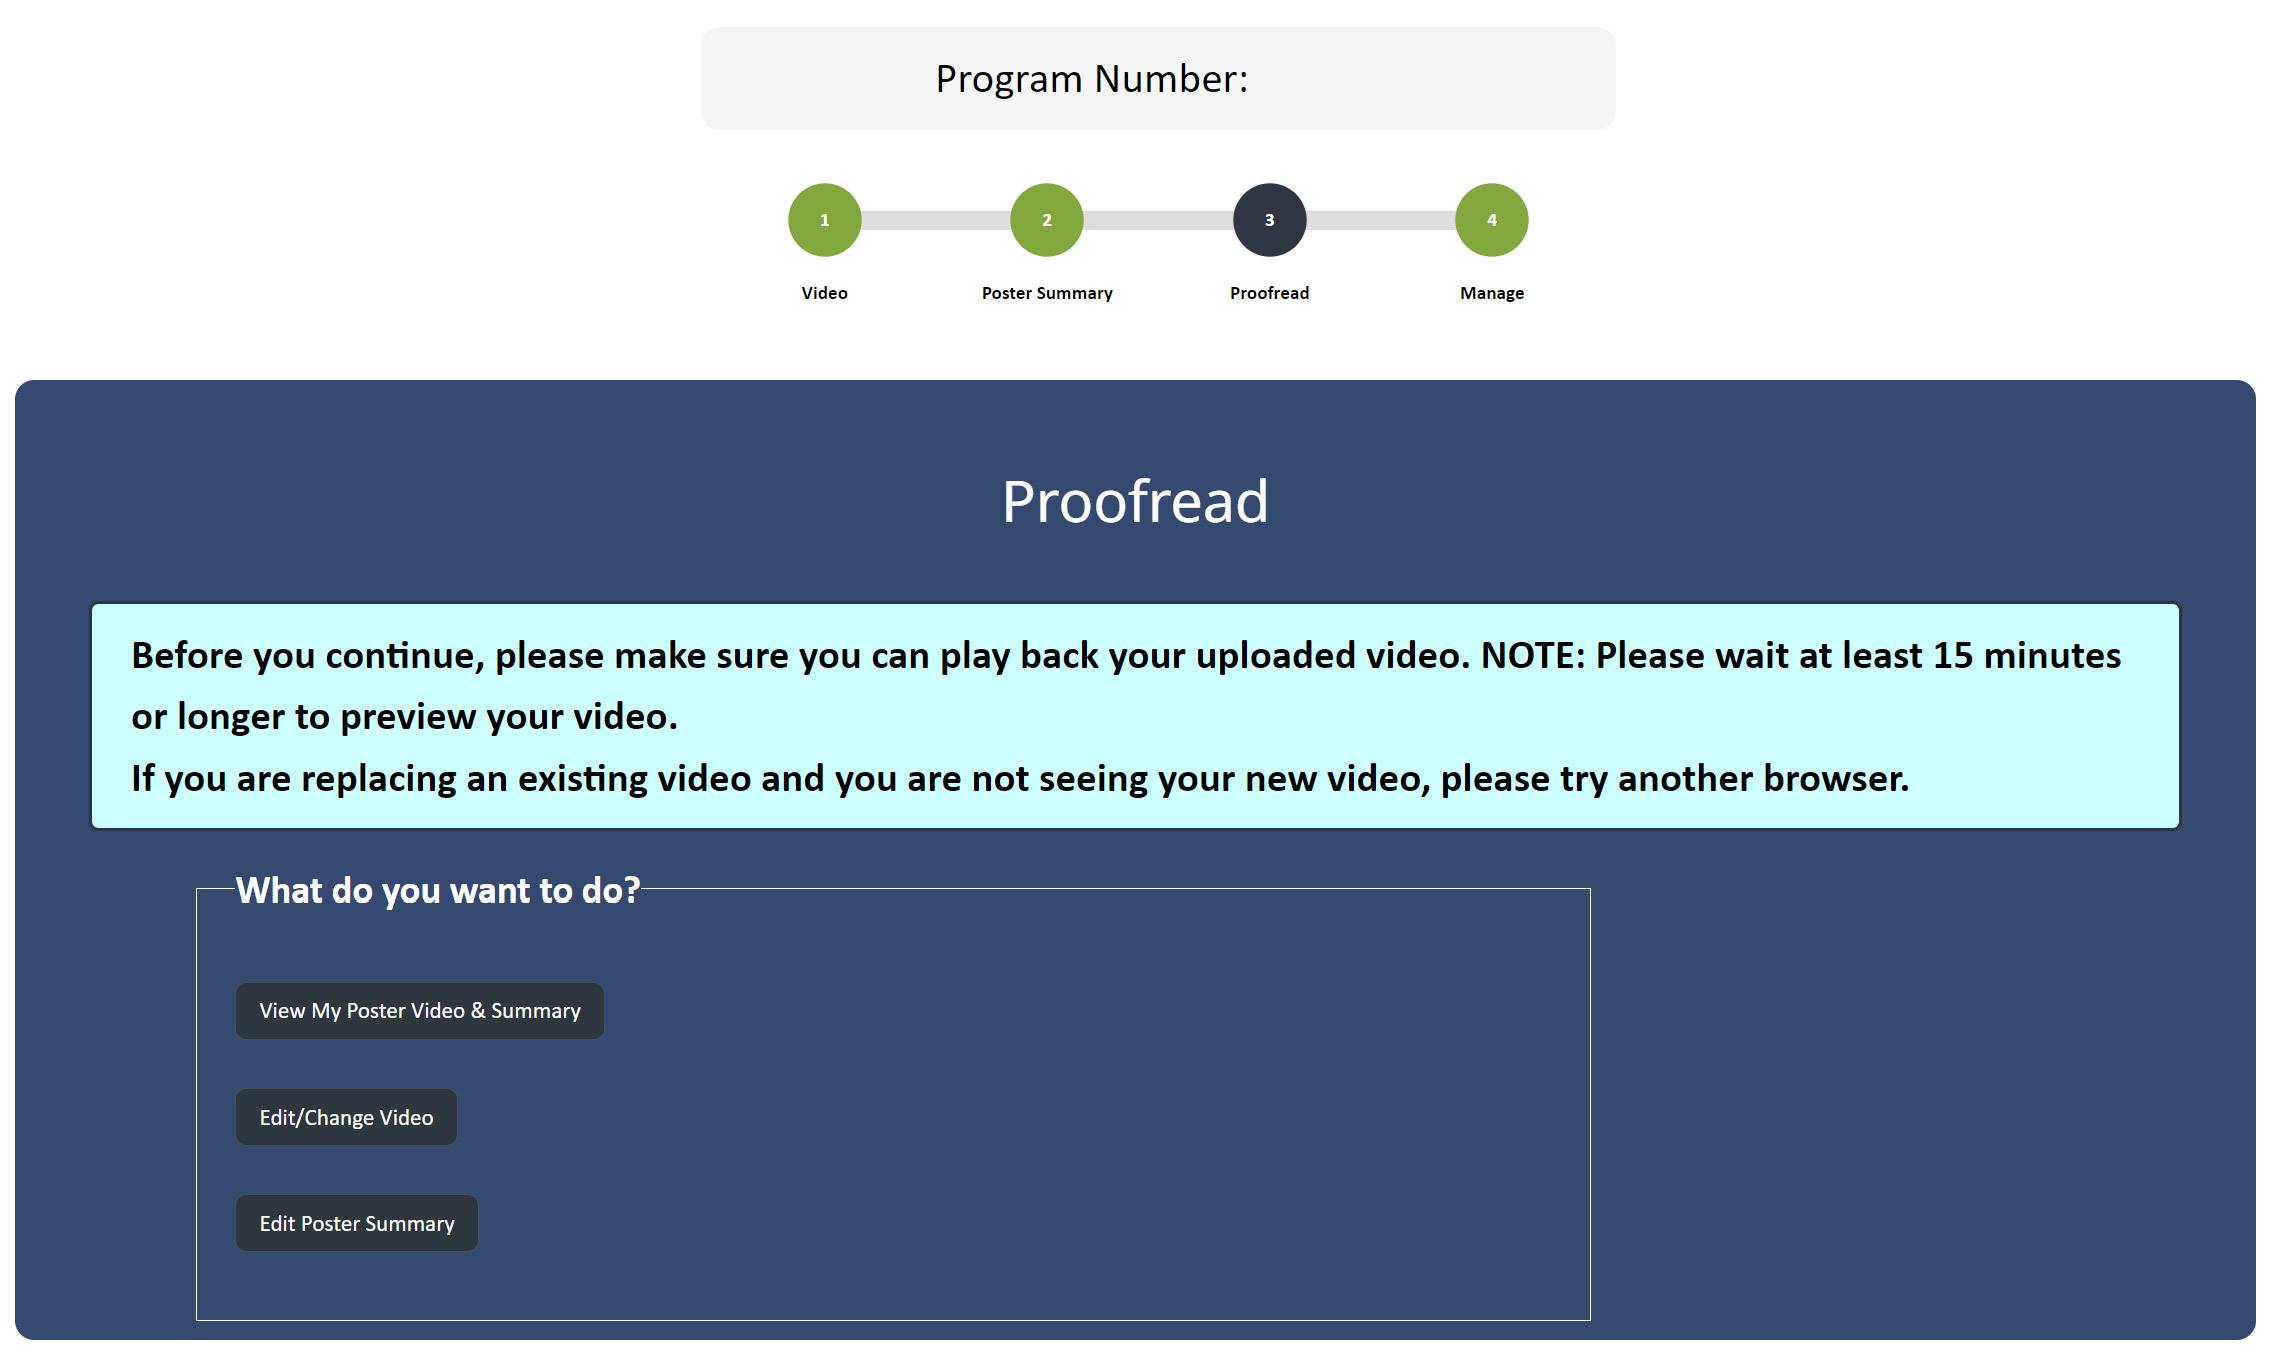 Now you must make sure your sections, timestamps, and video all display correctly.
Click the “View My Poster Video & Summary” button to open a pop-up window that will show you how your video will be viewed by attendees and by you when presenting your digital poster.
NOTE: Your video may not play correctly right away.
DO NOT REUPLOAD YET!
Please allow up to two hours for the video to be processed by the server. Log out of the site and return after that time to check again.
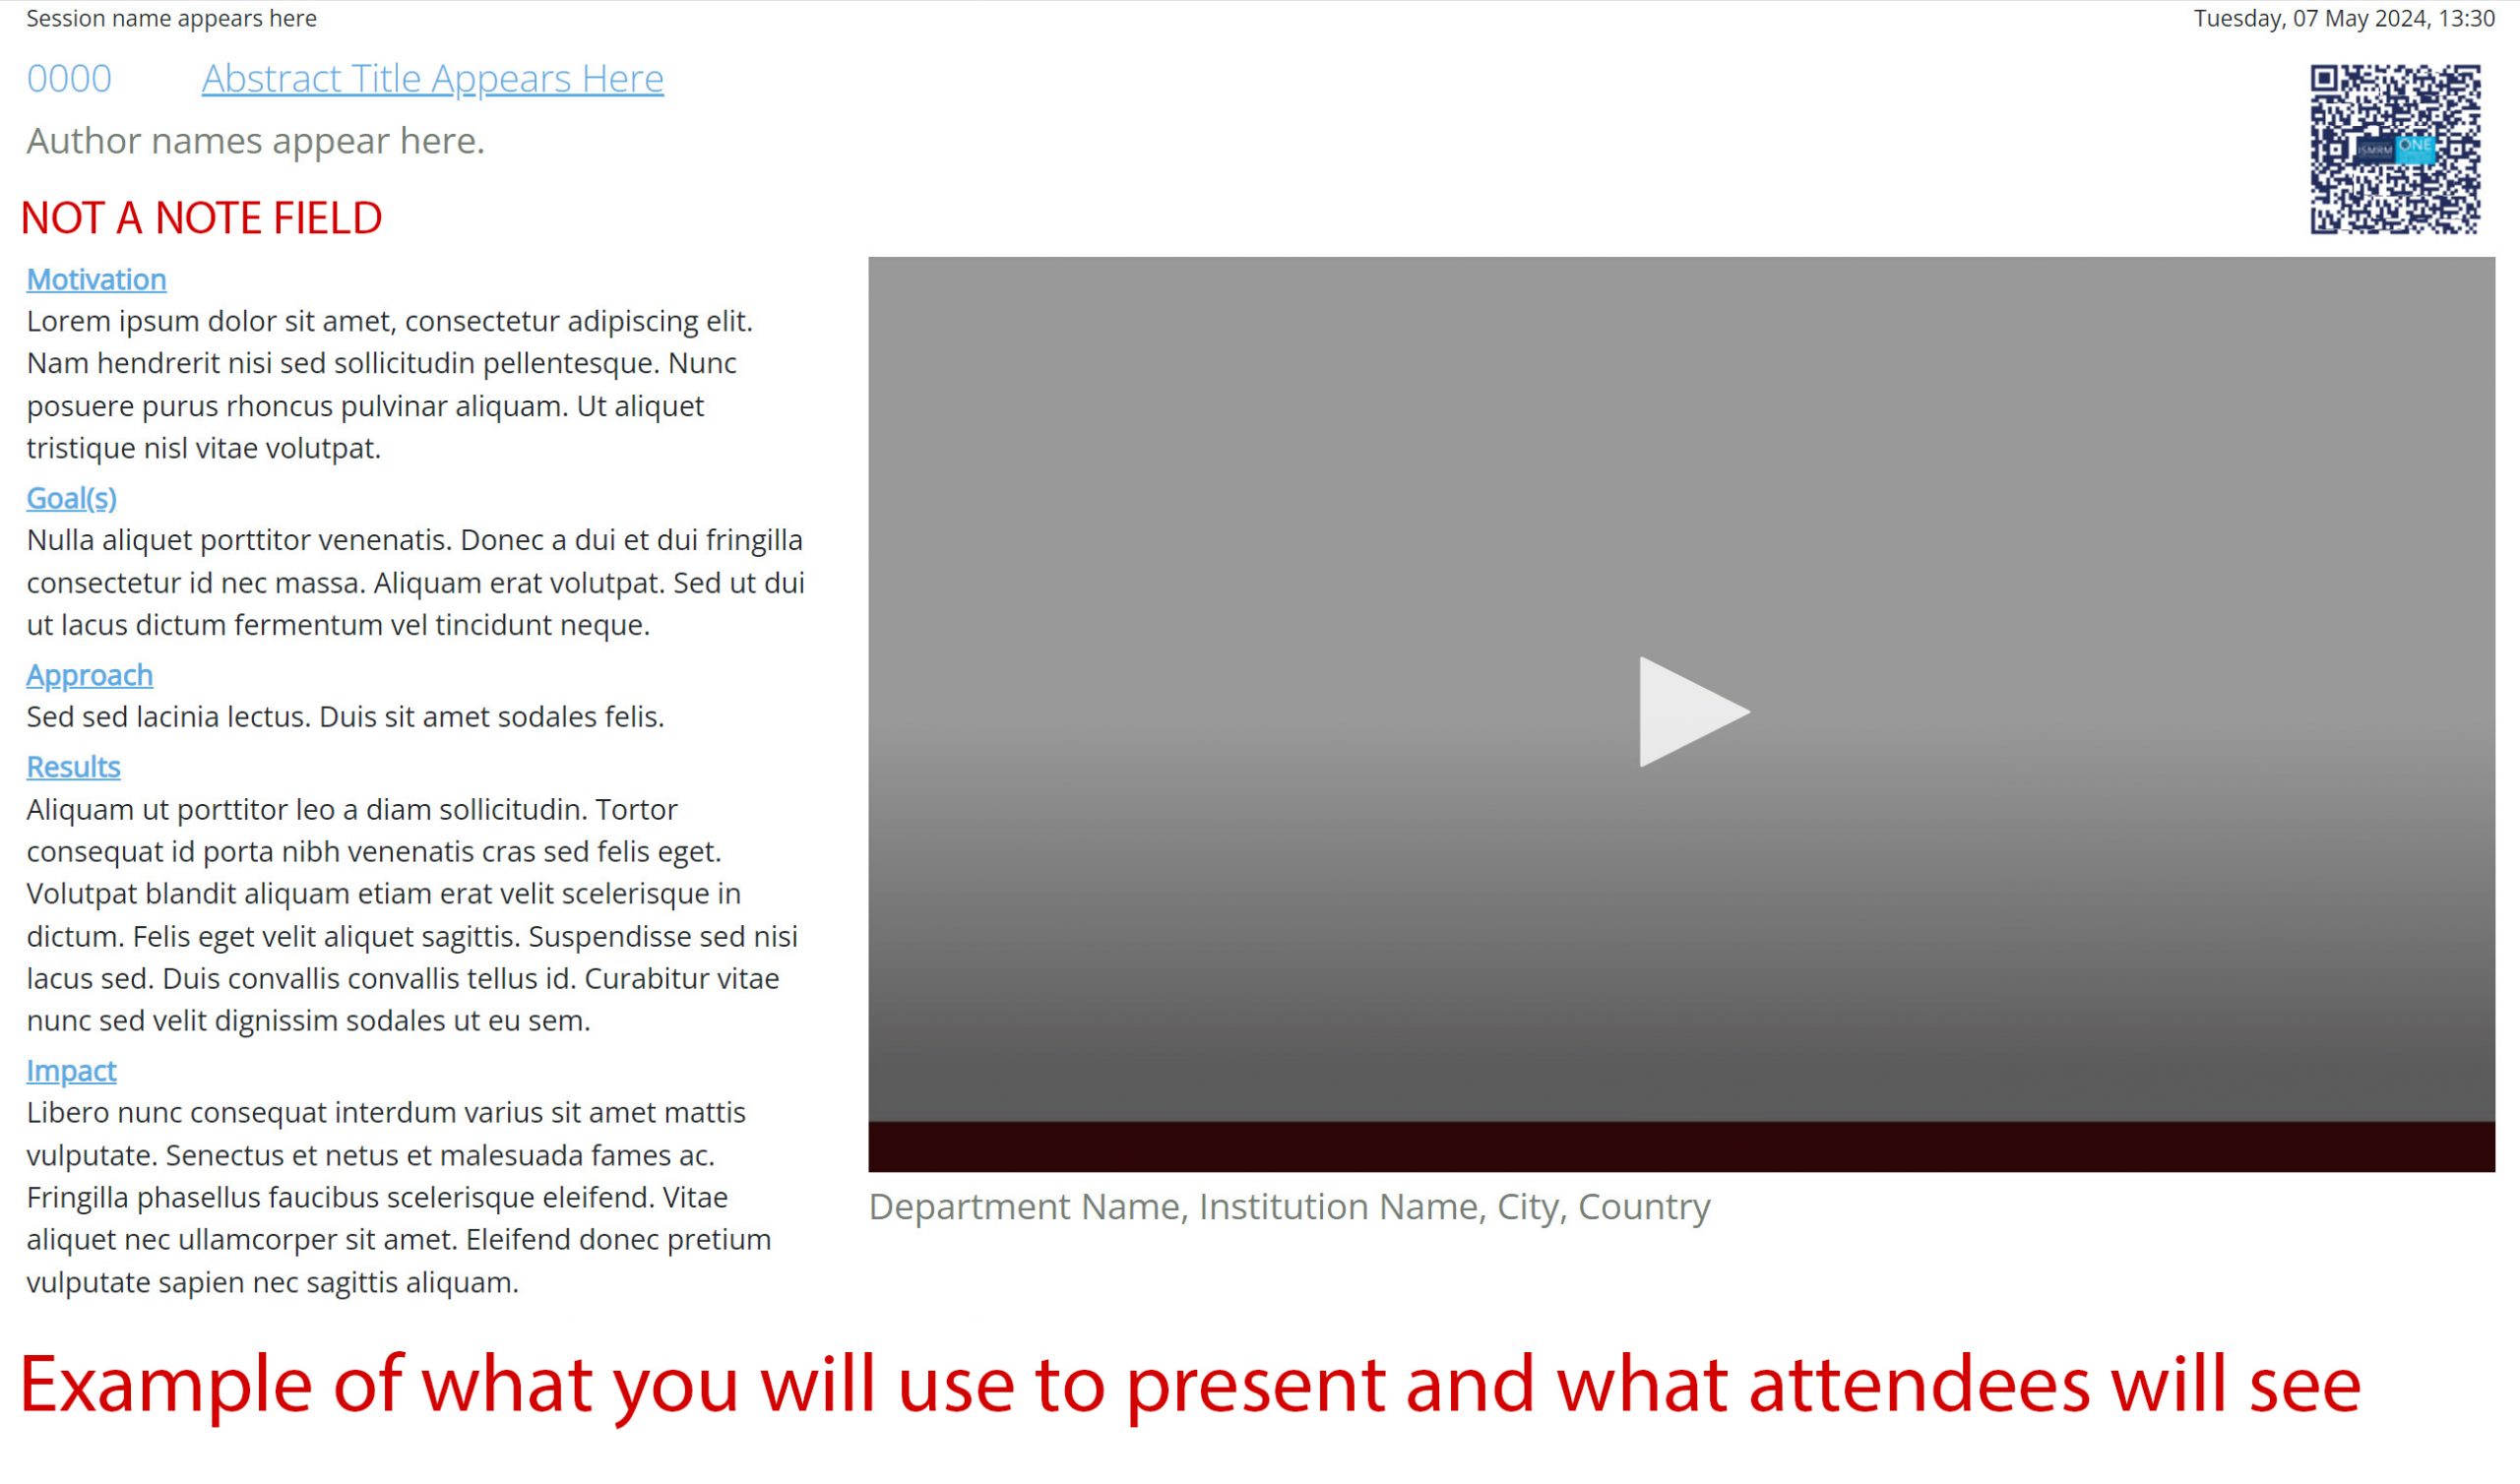 This is NOT a note field. To the left is an example of what attendees will see. Your abstract details will appear where the placeholder text is shown in this screenshot.
Test each timestamp by clicking on each section title and seeing what time the video jumps to.
Press play on the video and try the controls. You may also use the section title links while video is playing.
If any timestamps need adjustment, close the pop-up window and click the “Edit Poster Summary” button.
Once you are satisfied with everything, close the pop-up, click the checkbox that says, “
Step 4.
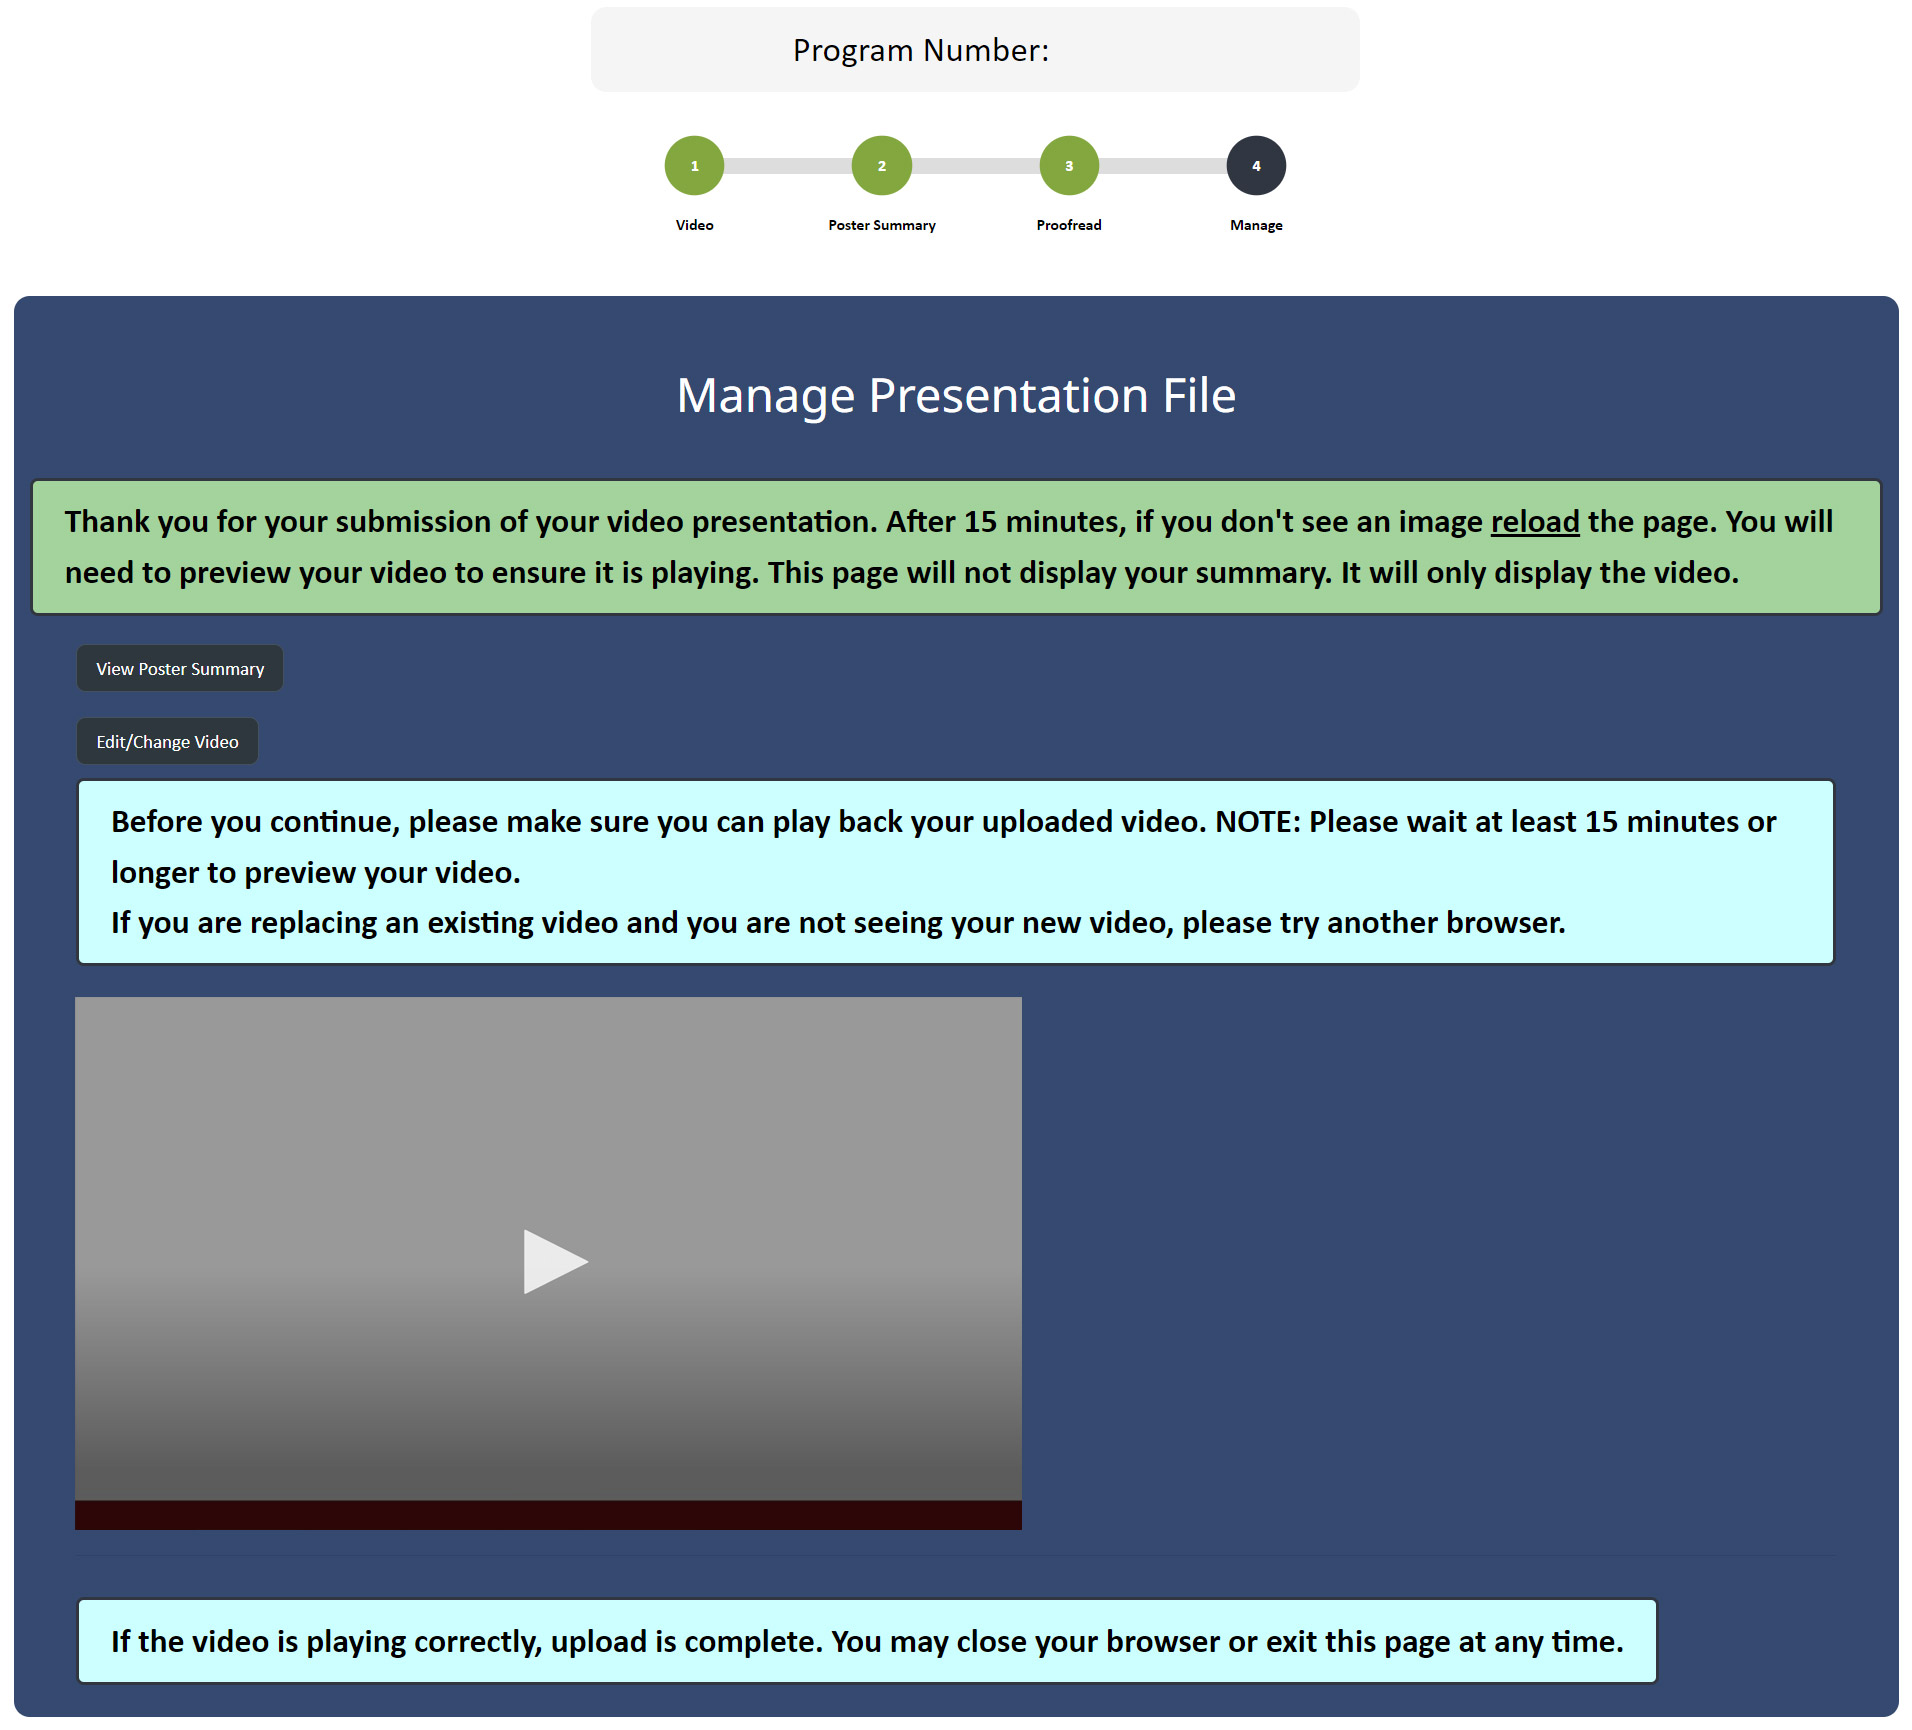 Your submission is now complete!
If you want to double-check anything, click the “View Poster Summary” button to reopen the pop-up window. Otherwise, you may close the browser tab.
If you have more than one digital poster, look for separate emails for each abstract. The link in each email is unique to that abstract.
Important Notes:
• Complete these steps for one poster at a time.
• Do not open Mirasmart in more than one tab or window.
Guidelines for
Traditional Posters
in Hawaiʻi
PRINTING NOTICE
You are responsible for printing, transporting, and mounting your poster. ISMRT does not provide these services. The PDF we request is for online viewing only.
If you do not want to travel with your poster, printers in Honolulu may be able to print it for you. Some options in Honolulu include proimagehawaii.com and copyhuthawaii.com. Additional print shops can be found via online search.
A traditional poster presentation combines a visual display on a poster board of the highlights of research with a question-and-answer opportunity. You will be assigned a one-hour period during which you should be present at your poster for discussion and questions. In addition, the poster will be available for viewing by attendees during all hours the poster hall is open.
Although it is preferred that the first author present their work, a co-author or institutional colleague may make the presentation if the first author is unavailable. We do not require notification of this.
Before Your Session
ISMRM – Your poster must be in place by 08:00 on Monday in the Exhibition Hall.
ISMRT – You may hang your poster starting at 2:00 PM on Friday.
Note: All ISMRT posters presentations are traditional posters.
See the ISMRT Guidelines page here.
The Poster Hall will be available for mounting of ISMRM posters starting on Sunday, 11 May, from 07:00 to 14:00. Your poster must remain mounted and available for viewing until Thursday, 15 May at 16:30. After this time, posters must be removed before 18:00 on Thursday, 15 May. Any posters remaining after this time will be discarded.
When your session begins, please stand next to your poster and be ready to present your work. Ask visitors to your poster their backgrounds, so that you can adjust your presentation to their expertise and interests.
NEW Online PDFs of Traditional Posters
Upload a PDF version of your poster to the meeting portal (Mira). This will allow online attendees to view your poster. The upload link will be emailed to you during the week of 14 April.
Please limit your PDF file size to less than 50MB.

Measurements
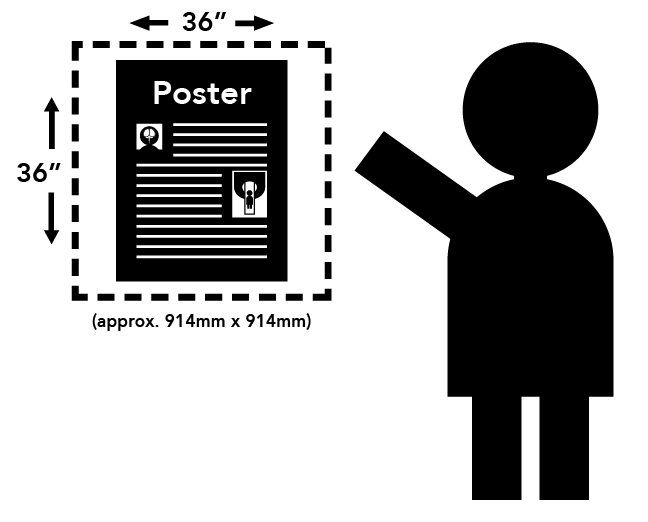
Each presenter is assigned a square space with maximum dimensions of 36 x 36 inches (approx. 92 x 92 cm). You are not required to completely fill this space, but posters exceeding these measurements, especially those extending into areas reserved for other posters, may be removed.
Mounting: Posters should be designed and printed so that they can be attached to the poster board with double-sided tape or push-pins, which will be found at each poster board. Additional tape or pins may be requested at the meeting registration desk.
Check the program book or online program to verify your program number and the day of your presentation in case there have been late changes!
Your Session
You will be assigned a program number and session by mid-March 2024. On the day of your poster session, be sure to check the program to confirm.
Suggestions for Preparing Scientific Posters
Content
- The poster should show the full title of your submission.
- Text should be brief and well organized, presenting only enough data to support your conclusions.
- The text should make clear the significance of your research.
- The text should include (most likely as separate elements of the poster) your hypothesis, methods, results, and conclusions.
Design
- A clear, simple, uncluttered arrangement is the most attractive and the easiest to read.
- For best legibility, it is suggested that the title lettering be at least 2 inches (5cm) high, with authors’ names and affiliations smaller.
- All lettering should be legible from a distance of approximately 5 feet (1.5m). It is suggested that font size should be at least 24-point. The typeface chosen should be simple and clear (e.g., Helvetica, Arial, Times).
- Color should be used sparingly to provide contrast. The featured parts of the poster can be highlighted with warm colors, and the less important parts can be done in cool colors. Some suggestions for color combinations are as follows: Green on white, red on white, black on white, blue on white, white on blue, and white on black.
- Illustrations should be simple and eye-catching, with unnecessary detail left out. If possible, convert tables to graphic displays. Pie graphs can be used to show parts of a whole, line graphs can be used to show trends or changing relationships, and bar graphs can be used to show volumes.
- Photos should be enlarged enough to show relevant detail.
- Standard computer printouts usually are not effective on posters because the type is too small and the lines are too thin to be seen from a distance.
- Patient confidentiality must be protected. No names or fully exposed faces should appear in illustrations or images.
- Remember, the poster is as much for discussion as for browsing. Be creative with the layout so that it complements your abstract!
Guidelines for
ISMRT Traditional Posters
in Hawaiʻi
PRINTING NOTICE
You are responsible for printing, transporting, and mounting your poster. ISMRT does not provide these services. The PDF we request is for online viewing only.
If you do not want to travel with your poster, printers in Honolulu may be able to print it for you. Some options in Honolulu include proimagehawaii.com and copyhuthawaii.com. Additional print shops can be found via online search.
A poster presentation combines a visual display of the highlights of research with a question-and-answer opportunity at a specified time.
Schedule:
The ISMRT Annual Meeting will be held in the Hawaiʻi Convention Center. The ISMRT Meeting Room will be available for poster mounting beginning Friday, 09 May at 14:00. Your poster must be mounted by 15:00 Friday, 09 May. The ISMRT Annual Meeting Poster Walking Tour will held from 17:05–19:00, Friday, 09 May. Please note that light boxes will not be allowed, and power outlets will not be available.
 Measurements:
Each presenter will be allotted a poster space of 91.44 cm Width X 91.44 cm Height (36 inches x 36 inches). Please note the allotted size and be attentive not to exceed these dimensions. Posters exceeding these measurements and extending into areas reserved for other posters will be removed.
Poster PDF:
A high-resolution digital PDF of your poster must be uploaded to the Mira site no later than 2 weeks before the conference, 25th April 2025 23:59 UTC, for use in the on-line program and to accompany your abstract.
Please limit your PDF file size to less than 50MB.
Poster Example Files
- Clinical E-Poster Example (PDF)
- Research E-Poster Example (PDF)
Sample Poster Templates
- Clinical Focus (.ppt)
- Research Focus (.ppt)
Mounting:
Posters should be designed and constructed so they can be attached to the poster board with push pins or double-sided tape (pins & tape will be provided by the ISMRT). Your poster number and last name will be mounted on the poster board assigned to you.
During Your Session:
Poster authors are required to be present, at their posters, during the Poster Walking Tour Reception to discuss their poster with attendees and answer any questions. A photographer will take your picture with your poster to be included in the E-Signals newsletter.
After Your Session:
Your poster must remain mounted and available for viewing until 17:00 on Sunday, 11 May. If you plan to show your poster at the ISMRM Annual Meeting, Monday through Thursday, 12 – 15 May in the Exhibition Hall, additional instructions will be available to you prior to the Annual Meeting. If you will not be showing your poster at the ISMRM Annual Meeting, you must remove your poster by 17:30 on Sunday, 11 May. Posters not removed will be discarded.
Suggestions for Preparing Traditional Posters for On-Site
Content:
- The poster should show the full title of your abstract.
- Text should be brief and well organized, presenting only enough data to support your conclusions.
- The text should make clear the significance of your research.
- The text should include the categories indicated by the focus of your poster, clinical or research, as outlined in the abstract submission instructions.
- Include all references.
Measurements:
Each presenter will be allotted one poster space of 91.44 cm Width X 91.44 cm Height (36 inches x 36 inches). Please note the allotted size and be attentive not to exceed these dimensions.
Design:
- A clear, simple, uncluttered arrangement is the most attractive and the easiest to read.
- The title lettering should be approximately 5cm (2 in.) high, with authors’ names and affiliations in smaller print.
- All lettering should be legible from a distance of 1.5m (5 ft.). The typeface chosen should be a simple and clear one (e.g. Times New Roman or Helvetica). Titles should be in all upper case letters, with the remainder of the text typed in a combination of capital and lower-case letters for ease of reading.
- Color should be used sparingly, and primarily to provide contrast. The featured parts of the poster can be highlighted with warm colors, and the less important parts can be done in cool colors. Some suggestions for color combinations are as follows: Green on white, red on white, black on white, blue on white, white on blue, and white on black.
- Illustrations should be simple and eye-catching, with unnecessary detail left out. If possible, convert tables to graphic displays. Pie graphs can be used to show parts of a whole, line graphs can be used to show trends or changing relationships, and bar graphs can be used to show volumes.
- Photos should be enlarged enough to show relevant detail. Standard computer printouts usually are not effective on posters, because the type is too small and the lines are too thin to be seen from a distance.
Patient confidentiality must be protected. No names (or other identifiers, i.e. social security numbers, medical record number, birthdates, etc.) should appear in illustrations.
Tips & Tricks for Presenting Your Work
Prepare a couple of bullet points about your poster about 3 minutes in length:
- What did you study/look at and why?
This could just be the title of your poster and purpose. - Key findings – don’t forget to point out pictures and graphs on your poster to help illustrate your findings.
- What does this tell us? Why is this important in practice? Effectively your conclusion and take-home message.
Then invite questions…
Analogy: Treat this a little bit like a weather forecast on TV with the map behind you pointing at the map to show you where the weather features in relation to cities. Who gets sunshine, rain, wind or severe weather conditions.
Only in your case you have your poster behind you, and you are showing the audience the best bits of your work.
About the Poster Tour
The session is split into 2 parts you will get information about which part your poster will be in:
PART 1: 17:45-18-20: half the poster presenters will present their posters in the first half of the session (35 minutes).
CHANGE OVER: 5 minute change over and a chance to grab refreshments.
PART 2: 18:25-19:00 the remaining poster presenters will present their posters in the second half (remaining 35 minutes).
This is so you can learn about everyone’s work, research, network and share ideas tips & tricks. Some people have more than one poster to present so this way you should have a chance to present both.
Poster winners will have a banner on the top and will have already presented their power pitches so should be easy to spot in the poster hall.
Poster sessions are informal, you talk to small groups of people but they are highly interactive. A great way to meet Radiographers / Technologists from around the globe and find out what they do at their site/ hospital. They are a great way to learn/share tips and tricks with one another. Have a problem in your department that you do not know how to tackle. Ask around as someone may have a solution that works well or methods that didn’t work that they’ve tried. It is a perfect opportunity to learn what MRI is like for Radiographers/Technologists in another country. Make new ISMRT friends and find potential research collaborators.
Add a QR code or email on your poster so people can get in touch with you easily.
Don’t forget your phone for the poster session as you may wish to take photos of other posters in the session that you are interested in plus contact details of your new friends.
How to Make a
Digital Poster Video
from Your Slideshow
Presenters can produce videos from their PowerPoint or Keynote slideshows. There are a few requirements for all videos submitted for inclusion in this conference:
| Maximum File Size: | 500 MB |
| Video Resolution: | 1280×720 (720p) |
| Video File Format: | MP4 (H.264 codec) |
| Frame Rate: | 30 FPS (29.97 FPS) |
| Filename: | [4-digit program #].mp4 |
Tips for Audio Recording:
The strength and clarity of your voice are vitally important to the success of any presentation. For best results, use these tips when recording your audio:
- Use as quiet an area as possible.
- Turn off air conditioners, fans, and other noisy machines while recording.
- Your recording space should be fairly small. A closet is great, a bedroom can be good, but a bathroom generally has too much echo.
- Avoid areas with echo. Rooms with bare walls often produce bad echo, which can make comprehension difficult for your audience.
- Sound dampening (echo reduction) can be done with rugs, curtains, furniture, and clothing. Soft items hung on a wall are great sound dampeners.
- Closets full of clothes or linens are ideal for recording at home.
- Use a good microphone or headset. Position the microphone just to the side of your mouth to reduce “pops” (bursts of air hitting the microphone, such as those produced by the letters p and b).
- Avoid using the built-in microphone on a laptop or webcam, as these will pick up a lot of background noise.
- If you only have access to a laptop/webcam microphone, try recording your audio separately while close to the mic.
- Speak loudly, clearly, and forcefully, as if you were speaking to a group of people outdoors. The audience will not want to have to interpret mumbling or quiet speaking and will simply move on to the next video.
- Do a test recording of a couple of minutes and review both the sound and picture quality, .MP4 format, and bit rate before recording the entire presentation. Make adjustments as needed.
English subtitles are optional for videos. For more information on adding subtitles, please see these how-to guides:
PowerPoint | Keynote
Making a Video in Microsoft PowerPoint
How to record narration and timings in PowerPoint:
https://support.microsoft.com/en-us/office/record-a-slide-show-with-narration-and-slide-timings-0b9502c6-5f6c-40ae-b1e7-e47d8741161c
- In the menu bar, click File
- Click Export
- Click Create a Video
- In the Presentation Quality drop-down, select Internet Quality (1280 x 720)
- Click Create Video
- In the Save As dialog, go to the Save as type box and select “MPEG-4 Video (*.mp4)”.
- Enter a name in the Filename box. Be sure to name your file according to the instructions on this website, under the appropriate tab for your presentation type.
For more detailed instructions, please visit Microsoft’s website here:
https://support.microsoft.com/en-us/office/turn-your-presentation-into-a-video-c140551f-cb37-4818-b5d4-3e30815c3e83
Be sure to select your version of PowerPoint from the options above “Save as a video file” to ensure the instructions cover your version of the software.
Making a Video in Apple Keynote
How to record narration and timings in Keynote:
https://support.apple.com/guide/keynote/record-audio-tan8a5df9cc5/mac
- Click on the service menu on top of your screen: File > Export To > Movie
- If you recorded a narration, you can click the Playback pop-up menu, then choose Slideshow Recording. If you want the slides to advance by themselves, you can leave the option Self-Playing.
- If you choose Self-Playing, you can enter the time you want the next slide or build to advance. These timings apply only to click events.
- On the Resolution drop-down menu, click Custom and enter 1280px x 720px. Be sure to select the H.264 option. This is .mp4 and it is going to work on any device and software.
- Click Next
- Enter a name in the Save As field. Be sure to name your file according to the instructions on this website, under the appropriate tab for your presentation type.
- To choose where to save the presentation, click the arrow next to the Where pop-up menu, then choose a location in the dialog. For example, it can be on the desktop. The default location Keynote chooses is the Keynote folder on your iCloud.
- Finally, click Export.
For more detailed instructions, please visit Apple’s website here:
https://support.apple.com/en-us/HT202220
Other software that can produce .MP4 files such as Camtasia, Premiere, Zoom, iMovie, etc., are also acceptable.
A Guide to
Effective Slide Design
Please observe these basic rules:
- Set your presentation’s page format to 16:9 widescreen. Presentations in 4:3 format (square) will end up with black bars on both sides (see illustration).
- Each slide should illustrate a single point or idea.
- Use large, legible letters.
- Do not crowd the slide.
- Message slides should contain no more than 7 lines, with 7 or fewer words per line.
- The ceilings are low in many rooms at the Singpore meeting, so screens may be smaller than you are used to – keep slides simple and uncluttered.
General PowerPoint Slide Guidelines:
- Keep the data on slides simple. If you have a great deal of data, divide it among several slides. The content of a single slide should be easily comprehended in 20 seconds. Remember: seven lines per slide and seven words per line!
- Text should be large and legible.
- If your data slides are in color, use only light colors, such as white and yellow, on a dark background, such as dark blue or black. Do not use colors such as red or purple against dark backgrounds.
- Patient confidentiality must be protected, and the patient’s a right to privacy should not be infringed upon without express informed consent. This includes removing identifying text in images, placing graphical overlays onto photographs, etc. No names or fully exposed faces should appear in illustrations or images.
- Avoid commercial references unless mandatory. A logo or institutional identification should appear only on the first title slide. Do not use such identification as a header on each slide.
- Limit the number of slides to no more than one (1) for each minute of your presentation. The slides should not contain your entire presentation. Their purpose is to support your talk and to emphasize the important points.
Word Slides:
- Title of text slides should generally contain five or fewer words.
- The space between lines should typically be the height of an uppercase letter.
Tabular Slides:
- Use graphs rather than tables if possible.
- Keep tabular slides as brief as possible.
- Two or more simple slides are better than one complicated slide.
- Make the font as large as possible.
- Do not crowd the slide.
Graph Slides:
- Keep graphs simple.
- Round off figures.
- Limit the number of captions – label key features directly with text.
- Use line graphs to show trends or changing relationships.
- Use bar graphs to compare volumes.
Chart Slides:
- Simplify charts to keep them legible.
- Break up complex charts into a series of slides.
Image Slides:
- Crop images to reduce wasted space.
- Match brightness and size/scale when showing comparisons.
- Try not to show more than 2-3 images across a slide, as they may be difficult to see from the back of the room.
- Highlight important features with arrows so you can reduce mouse usage.
- Use text titles or labels rather than a,b,c on images to show features.
- Display medical images in proper orientations, looking from left/anterior/inferior (left / front / toe).
Presenting in a Session Room:
How it Works
The following applies only to presentations in session rooms, not to any sessions in the Exhibition Hall.
For those new to presenting at ISMRM, this is a brief overview of how it works in session rooms.
During Your Presentation
When it is your time to present, you will be introduced by the moderator. Your first slide will already be on the screen when you walk up to the lectern.
There will be a preview monitor on/near the head table for you to see your slides. It is not necessary to turn an look at the projection screen. The image on the preview monitor is the same image the audience sees.
Note: Displaying notes (i.e. Presenter View) is not an option.
You will control your presentation with a computer mouse at the lectern. The left mouse button will advance the slides. The right mouse button will reverse the slides. The mouse can also be used as a pointer. The mouse pointer is seen on all screens (some rooms will have more than one screen) as well as on the live stream and recording.
Note: There is no keyboard at the lectern. There is no laser pointer, and please do not use your own. They will not be visible to online viewers.
All sessions are live streamed and recorded.
Audio Tips
- Adjust the microphone so that it is in the GENERAL DIRECTION of your face. It is VERY sensitive.
- Do not bring the microphone to your mouth as you would a handheld microphone.
- Allow at least 10-15cm (4-6in) of distance between your mouth and the microphone.
- Speak in a normal speaking voice. The AV tech will adjust the sound level for the room.
The computers will be controlled by AV staff located on the side or rear of the room. If you have audio in your file, it is a good idea to notify the AV techs prior to the session.
The session moderators will control a countdown clock. In addition to the time remaining, there will be a green, yellow, and red light.
- Green is your speaking time.
- Yellow means wrap up.
- Red means you are over time.
If the light turns red, moderators may ask you to stop even if you have not finished.
Some sessions may have a Q&A period between presenters. Moderators will make this decision based on the if the session if operating on time.
There is no connection for a laptop or other device to project at the lectern.
For any other questions, email the support address in the Vital Details column or talk to the AV techs before your session begins.